

Alexray
-
Posts
15 -
Joined
-
Last visited
-
Days Won
4
Alexray's Achievements
")


-
 ivan77 reacted to a post in a topic:
How to add Google reCAPTCHA v2
ivan77 reacted to a post in a topic:
How to add Google reCAPTCHA v2
-
recaptcha How to add Google reCAPTCHA v2
Alexray posted a topic in User JavaScript and CSS Discussions
Hi there, If you need to prevent some actions in your application made not by real people, this post is for you. I am going to explain how easuly add Google reCAPTCHA v2 to any DataPage. All you need is to have a Google account. First, you need to create a key http://www.google.com/recaptcha/admin This is very simple, you just need to type any label yuo wish, choose reCAPTCHA v2 and preferable validation method. I am going to use "I'm not a robot". It is important to add domain of all the websites where you are going to use the DataPage. In case you are going to use only URL deployment option, the domain of your account, like 'AccountName.caspio.com' will be enough. Where 'AccountName' is a name of your Caspio account that you can find following 'Help->About Caspio'. After creating a key you will see your site key that you will need to use later. Second step is to add 2 snippets of code: 1) That part should be added to the Head tag on your own website or to the Header of the Configure Fields screen when you edit your DataPage: <script type="text/javascript"> document.addEventListener("BeforeFormSubmit", function (event) { if(grecaptcha.getResponse().length == 0){ event.preventDefault(); alert('Please pass reCaptcha to verify you are not a robot') } }); </script> <script src="https://www.google.com/recaptcha/api.js" async defer></script> Before pasting do not forget to either uncheck the checkbox 'Enable HTML editor' in the Advanced tab or enable 'Source'. 2) Then you need to add HTML block where you wish reCaptcha to apper on your DataPage and add the next code: <div><div class="g-recaptcha" data-sitekey="YourSiteKey"></div></div> Where 'YourSiteKey' should be replaced with your site key. The last step is to relax and stay assured that no robots will be able to mess up your data.
-
Date validation on Submission Form
Alexray replied to Alexray's topic in User JavaScript and CSS Discussions
In addition to the JS solution. In case you have a date format with name of month or day of the week, you may also need variables for them: const weekday = ["Sunday","Monday","Tuesday","Wednesday","Thursday","Friday","Saturday"]; const month = ["January","February","March","April","May","June","July","August","September","October","November","December"]; let today = new Date(); let nameOfDay = weekday[today.getDay()]; let nameOfMonth = month[today.getMonth()]; let dd = String(today.getDate()).padStart(2, '0'); let mm = String(today.getMonth() + 1).padStart(2, '0'); //January is 0! let yyyy = today.getFullYear(); For example, if your format looks like 2022-Jun-17-Fri, then you get the same format this way: today = `${yyyy}-${nameOfMonth.slice(0, 3)}-${dd}-${nameOfDay.slice(0, 3)}`; Hope it helps someone. Let me know if there are any questions. -
Volomeister reacted to a post in a topic:
Date validation on Submission Form
-
ChristianM reacted to a post in a topic:
Date validation on Submission Form
-
Separate Input Fields for Height Parts
Alexray posted a topic in User JavaScript and CSS Discussions
Hi there, I decided to share a script that will help to have 2 separated virtual fields to display foots and inches separated. Similar to Date/Time Parts https://howto.caspio.com/tech-tips-and-articles/common-customizations/separate-input-fields-for-datetime-parts <script> document.addEventListener('BeforeFormSubmit', function(event) { let ft = document.querySelector("#cbParamVirtual1").value; let inch = document.querySelector("#cbParamVirtual2").value; document.querySelector("#InsertRecordHeight").value = `${ft}′ ${inch}″` }); </script> The result that we get will look like 1′ 2″. It can easily be chanded to whatever you need. For example if we change `${ft}′ ${inch}″` to `${ft}ft ${inch}in`, the result will be 1ft 2in. Hope it helps someone. -
Change Background Color on certain condition
Alexray replied to Alexray's topic in User JavaScript and CSS Discussions
Hi @Scarey, You just need to change backgroundColor to Color. Try that code: <script> const color = '#ff000094' const numberOfColumnForCondition = '5'; const condition = 'High'; document.addEventListener('DataPageReady', function(event) { let lines = document.querySelectorAll('tr[data-cb-name="data"]'); for (let line of lines) { if (line.querySelector('td:nth-child(' + numberOfColumnForCondition + ')').innerText == condition) { line.style.color = color; } } }) </script> The color is still red if you need another color, simply change HEX code '#ff000094' to whatever you need. Let me know if it works properly. -
Hi there, In case if you have 2 dropdowns where all of the options or some of them are equal and you don't want the same option to be choosen in both dropdowns, that JavaScript may help you: <script> document.addEventListener('DataPageReady', function (event) { const dropdown1 = document.querySelector("#InsertRecordDropDown1"); const dropdown2 = document.querySelector("#InsertRecordDropDown2"); dropdown2.onchange = function () { let options1 = dropdown1.options; for (let a1 = 0; a1 < options1.length; a1++) { if (options1[a1].value == dropdown2.selectedOptions[0].value) { options1[a1].disabled = true; } } }; dropdown1.onchange = function () { let options2 = dropdown2.options; for (let a2 = 0; a2 < options2.length; a2++) { if (options2[a2].value == dropdown1.selectedOptions[0].value) { options2[a2].disabled = true; } } }; }); </script> Make sure that you changed IDs of your dropdowns in constantas. Hope someone find it useful=)
-
Change Background Color on certain condition
Alexray replied to Alexray's topic in User JavaScript and CSS Discussions
Hello @WimCasp, It works with 'Sticky header', but it does not work if you also enable 'Freeze the first'. When 'Freeze the first' enabled, there is an event listener that removes styles added with that script. -
Hello, In case if you ever think about changing the button 'Choose file', that solution can be useful. Of course we can not simply change its text or change the appearence with CSS, because it is a default browser button. But we can add a label: <script> const customText = 'Select File'; document.addEventListener('DataPageReady', function (event) { let fileInputs = document.querySelectorAll("input[type='file']"); for (let fileInput of fileInputs) { let fileInputID = fileInput.id; let labelF = `<label for="${fileInputID}" class="labelF">${customText}</label>` fileInput.insertAdjacentHTML('beforebegin', labelF); fileInput.style.display = 'none'; } }); </script> <style> .labelF { text-align: center; background-color: #9e9e9e; border: 1px solid black; border-radius: 3px; padding: 2px; box-shadow: 2px 2px 6px black; } .labelF:hover { box-shadow: none; } </style> Now you can set up the style you need by changing its CSS or change the text 'Select File'. The main con of that solution, is that by hidind the default button, we also hide the text that usually goes next to it. Before you choose a file is says 'No file chosen', after you choose something it contains the name of the file. What do you think guys, is it going to be useful for someone?
-
Hi there, If you ever faced with the question to format the phone number in Caspio, you probably know that there is a solution to input the phone number in the needed format. But what if you already have a table with phone numbers in the format, like '0123456789', how would you outpu on the Tabular Report in the format '0123-456-789'? That's the question I faced and because of that I decided to write a small JavaScript that I want to share with you hoping it can be useful: <script> document.addEventListener('DataPageReady', function (event) { let columnNumber = 1; let numbers = document.querySelectorAll(`.cbResultSetOddRow > td:nth-child(${columnNumber}), .cbResultSetEvenRow td:nth-child(${columnNumber})`) for (let number of numbers) { let numberText = number.innerText; let cleaned = ('' + numberText).replace(/\D/g, ''); if (cleaned.length == 10) { let match = cleaned.match(/^(\d{3})(\d{3})(\d{4})$/); number.textContent = match[1] + '-' + match[2] + '-' + match[3]; } } }); </script> You can insert the code into HTML block, Header or Footer. Also, on the 3rd line 'let columnNumber = 1;' you need to change that number to the number of the column where you have your phone numbers. If you wish to change it to another format or to use it in another type of report and you do not know how to use that script, please let me know.
-
 RossChevalier reacted to an answer to a question:
How Do I Delete a Disabled Task
RossChevalier reacted to an answer to a question:
How Do I Delete a Disabled Task
-
Hello @RossChevalier, You can find the 'Delete' button under the drop-down 'More' If you do not see these buttons when you hover the task, then you need to clean the cookies of the browser. Hope it helps.

-
Hello @ChristopherNORD, There are 2 ways to set the height for multiple iFrames, depending where you add them: 1) If you add a few DataPages with iFrames into another DataPage, then you can use '.contentWindow' because the the domain will be the same. <script> document.addEventListener('DataPageReady', function (event) { let frames = document.querySelectorAll("#caspioform iframe"); for (let frame of frames) { frame.onload = function(){ let frameHeight = frame.contentWindow.document.body.scrollHeight; frame.style.height = frameHeight + 16 + 'px'; }; } }); </script> 2) In case you embed a few iFrames into your website, then we can't use '.contentWindow', but we can use '.postMessage' and provide mesages outside the frame with their names: <!-- Add to the Footer of the DataPage 1 --> <script> document.addEventListener('DataPageReady', function() { let frame ={frame1 : document.documentElement.scrollHeight}; parent.postMessage(frame, "*"); }) </script> <!-- Add to the Footer of the DataPage 2 --> <script> document.addEventListener('DataPageReady', function() { let frame ={frame2 : document.documentElement.scrollHeight}; parent.postMessage(frame, "*"); }) </script> <!-- Add to the webpage where you wish to display 2 or more iFrames --> <iframe id="frame1" name="" src="" title="" width="100%">Sorry, but your browser does not support frames.</iframe> <iframe id="frame2" name="" src="" title="" width="100%">Sorry, but your browser does not support frames.</iframe> <script> var eventMethod = window.addEventListener ? "addEventListener" : "attachEvent"; var eventer = window[eventMethod]; var messageEvent = eventMethod == "attachEvent" ? "onmessage" : "message"; eventer(messageEvent,function(e) { document.querySelector("#frame1").style.height = e.data.frame1 + 'px'; document.querySelector("#frame2").style.height = e.data.frame2 + 'px'; },false); </script> Make sure that you have same IDs for your iFrames or change them in the code. Hope it helps.
-
Kurumi reacted to a post in a topic:
Change Background Color on certain condition
-
Hi everyone, I wish to share JavaScript that can help you to highlight some records based on the condition. First you need to do for that is to paste the code into the Header: <script> const backgroundColor = '#ff000094' const numberOfColumnForCondition = '5'; const condition = 'High'; document.addEventListener('DataPageReady', function(event) { let lines = document.querySelectorAll('tr[data-cb-name="data"]'); for (let line of lines) { if (line.querySelector('td:nth-child(' + numberOfColumnForCondition + ')').innerText == condition) { line.style.backgroundColor = backgroundColor; } } }) </script> Also you need to adjust first 3 lines of the code: 1) const backgroundColor = '#ff000094' This constant is used for setting the color of the background. 2) const numberOfColumnForCondition = '5'; The number 5 is the number of the column where we are going to check the condition. 3) const condition = 'High'; High is the value of our condition. So, in our example, we are going to highlight fields (rows) where the value in the 5th column equals 'High'.

-
Display Link if Any Record Added
Alexray replied to deemuss's topic in User JavaScript and CSS Discussions
Hello. Here is one more way to do the same: <a id='aLink' href="[@app:URL_1]">Caspio</a> <script> document.addEventListener('DataPageReady', function (event) { if (document.querySelector('.cbResultSetDataRow[data-cb-name="data"]') == null) { document.querySelector('#aLink').style.display = 'none' } }); </script> -
Kurumi reacted to a post in a topic:
Date validation on Submission Form
-
sandy159 reacted to a post in a topic:
Date validation on Submission Form
-
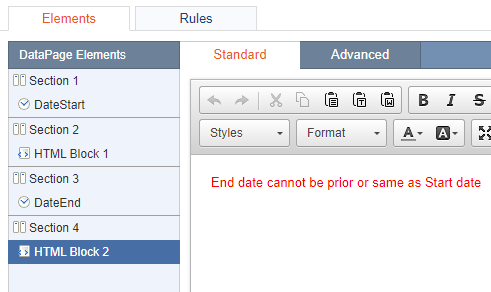
Hello Caspio Family, Unfortunately, Caspio doesn't have a feature that would allow validating the date before the Submission Form. The only way I found using Caspio standard features is to show a warning message when the date doesn't fit the condition (e.g. when the date should not be prior to today). You can do that with the help of rules. I will show you an example with two dates 'Start Date' and 'End Date' with conditions: the Start Date shouldn't be prior to today and the End Date should not equal or be before the Start Date. 1) Add 2 HTML blocks beneath each Date field and add a section to each HTML block 2) Inside HTML blocks we need to add some warning message in case the condition is not met 3) Create 2 Rules as on screenshots That solution will show our warning messages, but won't prevent form submission if a user disregards the warning. But if it is necessary to let users submit only correct dates, you can use the second solution with JavaScript: 1. Insert Header&Footer, HTML block 1, HTML block 2, and place them below our Date fields. No need to add extra sections. 2. In the Header enable 'Source' and paste the code:<script>document.addEventListener("BeforeFormSubmit", function (event) {startDate = document.querySelector("#InsertRecordDateStart").value;endDate = document.querySelector("#InsertRecordDateEnd").value;warn1 = document.querySelector("#warning1");warn2 = document.querySelector("#warning2");var today = new Date();var dd = String(today.getDate()).padStart(2, '0');var mm = String(today.getMonth() + 1).padStart(2, '0'); //January is 0!var yyyy = today.getFullYear();today = mm + '/' + dd + '/' + yyyy;if (startDate < today) {event.preventDefault();warn1.style.display = 'block'} else {warn1.style.display = 'none'}if (endDate <= startDate) {event.preventDefault();warn2.style.display = 'block'} else {warn2.style.display = 'none'}});</script> 3. In the HTML block 1 enable 'Source' and paste:<span id="warning1" style="color:#FF0000;display:none;">Start date cannot be in the past or empty</span> 4. In the HTML block 2 enable 'Source' and paste:<span id="warning2" style="color:#FF0000;display:none;">End date cannot be prior or same as Start date or empty</span> 5. Make sure your datafield 1 and datafield 2 are called 'DateStart' and 'DateEnd' respectively or in the JavaScript added to the Header you need to replace in the linesstartDate = document.querySelector("#InsertRecordDateStart").value;endDate = document.querySelector("#InsertRecordDateEnd").value;to the name of the fields you have. You can test to see how it works on my DataPages: 1st solution with Rules 2nd solution with JS


- 7 replies
-
- 4
-
-
- js
- javascript
- (and 3 more)
-
Hi Ron, Is the form submitted even you click cancel? If yes, then I will need to check your DataPage. Please provide the deployed URL and test credentials if you have authentication. Regards, Alex
-
Kurumi reacted to a post in a topic:
Confirm form submission if a certain condition is met
-
kpcollier reacted to a post in a topic:
Confirm form submission if a certain condition is met
-
Hello Caspio Family, I wish to share a JS code snippet with you, in case if you wish your users to confirm form submission if a certain condition is met. For example, if some field is empty. Let's say we have a text field for email which is not required. When that field is empty, we wish to ask our visitors if they are sure they want to submit the for without the email. document.addEventListener("BeforeFormSubmit", function (event) { if (document.getElementById("InsertRecordEmail").value == "") { event.preventDefault(); if (confirm("Are you sure you want to submit the form without your email?")) { document.forms["caspioform"].submit(); } } }); Let me know who thinks it is useful.


