Leaderboard


Popular Content
Showing content with the highest reputation since 03/30/2016 in Posts
-
The Caspio platform is free of charge for producing non-commercial apps in support of Ukraine and the Ukrainian refugee crisis. If you need an app, please post your requirements here, and we will do our best to match you with someone who can build it. Caspio developers: we call on you to join the mission. For non-profits or people with ideas: please post your idea here without revealing any confidential details. For volunteers who can help with the app development: post your website or contact details here. Read this press release for the complete details: https://www.caspio.com/news/articles/caspio-provides-free-no-code-platform-to-help-ukraine/5 points
-
.thumb.jpg.03878e50b4d1236f6c1e432d00fe2a55.jpg)
Login after User Registration
Nursultan and 4 others reacted to DefinitelyNot31337 for a question
Hello @TroubleShooter, Yes, you can. Currently, it is only possible with JavaScript. The idea is to place the Registration Form and Standalone Login Page side-by-side (or at least, in the same page). You may hide the Login Form ( using <div style="display: none;"></div> on the Header/Footer of the DataPage || More about here...), on your Registration Page but I rather keep them visible so the users can opt to just log-in if they already have an account; or register, if they don't. After registration, JavaScript will fill-out the login form, and submits it programatically, therefore logging-in the newly registered user. The only requirements to this implementation are: 1.) Login DataPage and Registration Form DataPage are deployed on the same page. 2.) Both DataPages are AJAX-Enabled! 3.) Headers/Footers should have the HTML Editor disabled from the Advanced tab. Without futher ado, let's do this. 1.) Open DataPage Configuration for your Registration Page: 2.) Go to 'Configure Fields Section' 2.1.) Add a Header and Footer (Disable HTML Editor from the advanced tab) 2.2.) Paste the code snippet in the Footer and modify the following information. <script> document.addEventListener('BeforeFormSubmit', function() { var registrationDP = "[@cbAppKey]"; var loginDP = "378fd3458dfsjhefjhqerwfdsyui3274239"; //Replace with the AppKey of your Standalone Login Scren var username_field = "username"; //replace with the name of your username field (CASE SENSITIVE!) var password_field = "password"; //replace with the name of your password field (CASE SENSITIVE!) //No modifications necessary from this point onward. document.querySelector(`[action*="${loginDP}"] [id*=xip_username]`).value = document.querySelector(`[action*="${registrationDP}"] [id*=InsertRecord${username_field}]`).value document.querySelector(`[action*="${loginDP}"] [id*=xip_password]`).value = document.querySelector(`[action*="${registrationDP}"] [id*=InsertRecord${password_field}]`).value }) </script> 5.) Go to 'Destination and Messaging' 5.5) Set Destination after record submit to: Display a message; Disable the HMTL Editor! 5.6) Paste the code snippet below; then modify. Registered Successfully. <script> var loginDP = "378fd3458dfsjhefjhqerwfdsyui3274239"; document.querySelector(`[action*="${loginDP}"]`).submit(); </script> After saving, you should be good to go. Working example: https://stage.caspio.com/support/forums/DefinitelyNot31337/register-login/index.html Application Export Package: CaspioData_2019-Apr-02_0219.zip Good luck and happy hacking! Regards DN31337!5 points -
Hi, Just wanna share this script I made that changes the background color of each record in a Gallery Report DataPage when clicking the button. For the button: <button onclick="RandomColor()">Try it</button> For the function that's responsible for changing the colors (For this one, there is no fixed set of color because this makes use of randomizers for setting the color code, so all colors possible can show up): <script> function RandomColor() { var x = document.querySelector("section[class*='cbColumnarReport cbReportSection']"); x.querySelectorAll('div > div:nth-child(1)').forEach(e => e.style.backgroundColor = '#' + ('0'+(Math.random()*255|0).toString(16)).slice(-2) + ('0'+(Math.random()*255|0).toString(16)).slice(-2) + ('0'+(Math.random()*255|0).toString(16)).slice(-2)) } </script> Sample DP: https://c1hch576.caspio.com/dp/db26a00071c83c69ac9947d1bfd9 Alternatively, if you only wish to have a predefined set of colors to choose from, you can use this (simply change the colors in the array to your liking): <script> var colors = ["red", "blue", "green","orange","yellow","violet","lightblue","cyan","magenta"]; function RandomColor() { var x = document.querySelector("section[class*='cbColumnarReport cbReportSection']"); x.querySelectorAll('div > div:nth-child(1)').forEach(e => e.style.backgroundColor = colors[Math.floor(Math.random() * colors.length)]) } </script> Sample DP: https://c1hch576.caspio.com/dp/db26a000574d59f66468479b955a Hope this helps!


 4 points
 -

Date validation on Submission Form
Volomeister and 3 others reacted to Alexray for a topic
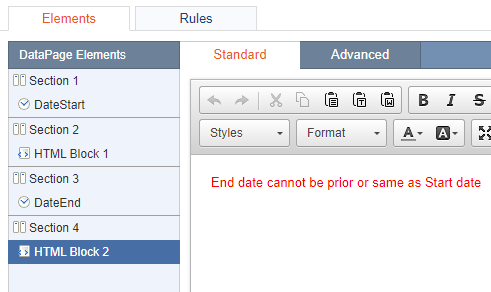
Hello Caspio Family, Unfortunately, Caspio doesn't have a feature that would allow validating the date before the Submission Form. The only way I found using Caspio standard features is to show a warning message when the date doesn't fit the condition (e.g. when the date should not be prior to today). You can do that with the help of rules. I will show you an example with two dates 'Start Date' and 'End Date' with conditions: the Start Date shouldn't be prior to today and the End Date should not equal or be before the Start Date. 1) Add 2 HTML blocks beneath each Date field and add a section to each HTML block 2) Inside HTML blocks we need to add some warning message in case the condition is not met 3) Create 2 Rules as on screenshots That solution will show our warning messages, but won't prevent form submission if a user disregards the warning. But if it is necessary to let users submit only correct dates, you can use the second solution with JavaScript: 1. Insert Header&Footer, HTML block 1, HTML block 2, and place them below our Date fields. No need to add extra sections. 2. In the Header enable 'Source' and paste the code:<script>document.addEventListener("BeforeFormSubmit", function (event) {startDate = document.querySelector("#InsertRecordDateStart").value;endDate = document.querySelector("#InsertRecordDateEnd").value;warn1 = document.querySelector("#warning1");warn2 = document.querySelector("#warning2");var today = new Date();var dd = String(today.getDate()).padStart(2, '0');var mm = String(today.getMonth() + 1).padStart(2, '0'); //January is 0!var yyyy = today.getFullYear();today = mm + '/' + dd + '/' + yyyy;if (startDate < today) {event.preventDefault();warn1.style.display = 'block'} else {warn1.style.display = 'none'}if (endDate <= startDate) {event.preventDefault();warn2.style.display = 'block'} else {warn2.style.display = 'none'}});</script> 3. In the HTML block 1 enable 'Source' and paste:<span id="warning1" style="color:#FF0000;display:none;">Start date cannot be in the past or empty</span> 4. In the HTML block 2 enable 'Source' and paste:<span id="warning2" style="color:#FF0000;display:none;">End date cannot be prior or same as Start date or empty</span> 5. Make sure your datafield 1 and datafield 2 are called 'DateStart' and 'DateEnd' respectively or in the JavaScript added to the Header you need to replace in the linesstartDate = document.querySelector("#InsertRecordDateStart").value;endDate = document.querySelector("#InsertRecordDateEnd").value;to the name of the fields you have. You can test to see how it works on my DataPages: 1st solution with Rules 2nd solution with JS


 4 points
 -

Import files then insert into table
ReeganAnne and 3 others reacted to MattD for a question
I was trying to figure out how to insert a large number of photos (>1000) into a table of staff. I could successfully import the files into caspio bridge, but could not find a documented way to automate the process of inserting these into the table. Support did not think it was possible, but I was able to find a solution! Posting this in case it is helpful for others. Solution: 1. Ensure each file is named in a way that allows it to be linked to the rest of the data. In my case I named each file with the linkage key 'staff_id' e.g. "1.jpg" 2. Upload the files into a folder in Caspio bridge, as documented elsewhere. In my example, this is /photos/. 3. In the table, create a formula field that generates the path of the file that corresponds to the record. E.g. in my dataset, the path for the correct file is "/photos/1.jpg"; where staff_id = '1'. The formula is: '/photos/' + CONVERT(VARCHAR, [@field:staff_id]) + '.jpg' 4. Save this field. It should now contain a generated list of paths. 5. Go back to the Table Design section and change the field type from "Formula" to "File". It will convert the type to "File" but retain the path data and now the file is correctly embedded. I have suggested that Caspio support add this to their documentation as I think it could be a very useful feature.4 points -
Thank you, Caspio, for offering this. I unfortunately do not have the bandwidth to take on any projects at the time, but I can offer some free consultations. To schedule a time, visit https://lightbulb.as.me/consulting and choose a time. To get a consultation for free, use the coupon code свобода. Somewhere in the form, add your Caspio account id so I can confirm you have a free Caspio account. Stay safe! CHAD4 points
-

Google Map Mashup Set-Up with Casio URL Deployment
sistemaslt and 3 others reacted to jbloome for a question
Howdy All, My Google Maps finally work and after two days I have an answer to my question which you might find useful. 1) I don't use a webpage so my deployment method is URL in Caspio's servers. 2) Search for Google Cloud API console and sign up for a billed API account (I had a free account and didn't realize I had to have an API attached to a billed account). I think with the billed account the free Map View limit is 28,000 inquiries/month before incurring expenses. 3) Start a new project through the Google Console and get your API code for your billed account. 4) On your Google Cloud API account search the API library and Enable the API for Maps Javascript API and Geocoding. 5) On the map mashup select the search and results table from where you are pulling data not the datapage where you might have the map mashup (e.g. my maps search datapage pulls data from my homes_table, in this case I would choose the homes_search and results datapage pulling from the homes_tbl not the maps search and results datapage). 6) Make sure you add your own customized field (e.g. in addition to city, state, zip my Address field is called Address1 and I had to add this field to generate the proper code snippets which included Address1 not Address which is the default). 7) For the map mashup the first code snippet "before the webpage deployment" goes into a header for the Configure Results Page Field. 8) The 2nd code snippet goes in a HTML block(make sure that it is at the bottom with no other fields below it) on the Configure Results Page. 9) The 3rd code snippet goes in a HTML block (make sure that it is at the bottom with no other fields below it) on the Configure Details Page. 10) On your Datapage Data Source page uncheck Responsive, go to Your Results Page and uncheck all the editing options, go back to the Datapage Data Source and check disable AJAX loading. That should work!4 points -
Keep in mind hiding these buttons through CSS will not disable them. If anyone presses 'Enter' they will be able to 'click' the button. You need JavaScript to disable it completely and then use CSS for hiding, or you can use JavaScript for both. For Submission, you do it like: <script> document.getElementsByClassName('cbSubmitButton')[0].disabled = true; document.getElementsByClassName('cbSubmitButton')[0].style.display = 'none'; </script> Update Form/Details Page <script> document.getElementsByClassName('cbUpdateButton')[0].disabled = true; document.getElementsByClassName('cbUpdateButton')[0].style.display = 'none'; </script> If you have multiple forms on a single Webpage, just change 0 to any number depending on the order of the forms, 0 means it's the first form, and so on. If you just really want to hide, then just remove the 1st line.4 points
-
Hello @IamGroot, Just wanted to inform you, I found a way to export/import a table/database with List-DataType value inside it. 1. Change the DataType to "Text(255) field" and Export it. 2. And in your Excel file, make sure that the value for the List-String field is comma separated like this: (Item1,Item2,Item3,Item4, etc.) 3. Proceed with the import as usual. After successfully importing your file. Go to your Table and to the Table Design. 4. Change the "Text(255) Field" (The one we changed in step 1) back to List-String DataType. 5. Then it will just return the way it was. If you want to export it (reapeat step(1)). I hope this helps ~WatashiwaJin~4 points
-

Connect to Google Drive
Harbinger and 3 others reacted to LunaLovegood for a question
Hello @directrix, I got this same error and contacted their support team. Then advised me that this is a Google issue as they have made changes recently. But if you have an existing task that is connected to Google Drive, it'll work perfectly. Fret not, Caspio DevOps team is now looking for a way to make this work. *winks*4 points -
 I thought this might be helpful across the board for people developing in Caspio. I've been trying to do a better UI for data entry on web pages that also have to show results in a tabular report. Since iframes don't reliably pass parameters from parent to child and back it's necessary to sometimes deploy 2 datapages (a Submit or Details and a Tabular) on the same web page. This doesn't really look good from a UI perspective. This solution requires using bootstrap and jquery but it's fairly straightforward. One option is to put the the Submit/Details deploy code in the first div with something like class="col-md-3" and the Tabular deploy code in the next div with class="col-md-9" (divs in bootstrap with col classes must add up to 12 but no more than 12, in basic mode). This will put the 2 datapages next to each other, the 1st with 1/4 screen width and the 2nd with 3/4th. However, this setup looks cluttered and can constrain the Tabular report which often needs full page width to show its data clearly. So the ideal would be to onload hide/collapse the first div (with the Submit/Details form) and have the second div (tabular report) a full 12 columns wide. Then click a button or link to show the 1st div (Submit form) and change the 2nd div (tabular report) to 9 columns, thereby displaying both datapages when data entry/edit is needed. Clicking the button/link again (in this method) will collapse div1 and expand div2 back to 12 columns. So it's easy to toggle views this way. To do this: Put this in the body of your webpage (you may have bootstrap and jquery referenced differently): <div class="container-fluid"> <br> <div class="row"> <div class="col-md-3 bg-faded"> <div id="showsubmitform" class="collapse"> Caspio Deploy Code for Submit/Details form </div> </div> <div class="col-md-12" id="right"> <div> Caspio Deploy Code for Tabular Report </div> </div> </div> </div> <script src="//ajax.googleapis.com/ajax/libs/jquery/2.2.4/jquery.min.js"></script> <script src="//maxcdn.bootstrapcdn.com/bootstrap/3.3.7/js/bootstrap.min.js"></script> <script> $('#btnSwitch').click(function(){ $('.col-md-3').toggleClass('show'); $('#right').toggleClass('col-md-9 col-md-12'); }) </script> And then put a button or link elsewhere on your page, wherever you want to show it: <a class="btn page-action" id="btnSwitch" href="#showsubmitform" style="color:green;" data-toggle="collapse"><i class="fa fa-plus" aria-hidden="true"></i> Submit New Data</a> When the page is loaded the Tabular Report will be the only datapage showing, in full width. When the 'Submit New Data' link is clicked the Tabular Report moves to the right and shrinks to 9 columns from 12. The space that opens on the left is 3 columns wide and will now show the Submit/Details form. When the 'Submit New Data' link is clicked again it will hide the Submit/Details form and expand the Tabular Report back to 12 full columns. You can change the column numbers of the divs and button ids and labels to suit. This solution might help with some UI massaging, if anyone is working on that aspect of their app...4 points
 -
I've noticed that the topic of using AI in Caspio apps hasn't gotten much attention on this forum. This is surprising, given the big advancements in AI over the past few years. Recently we discussed this topic during the Partners’ Office Hours with @nikcaspio and decided to test the water sharing some ideas on the forum and hearing what the community thinks. I'd gladly give more examples in future posts if you find these thoughts helpful. The topic is almost endless, with so many ways to use AI. But let's start simple: WHAT IS DOCUMENT UNDERSTANDING We all know how Caspio can help create outgoing PDF documents based on database records. But what about incoming documents like invoices, receipts, delivery notes, or bills of lading? These often come as files or even paper documents. Here, we have to do the opposite of document creation. We need to take the document and turn it into data. Usually, someone has to enter this data manually into Caspio, right? Well, that was the old way Things have changed. To show what's possible now, I made a short video using our Caspio app, where I upload a JPEG file with an invoice, and the system extracts the necessary data from it and put it into Caspio: https://www.loom.com/share/d21eb53d9b5a4540a6282a56d8d47f0e Is it magic? No, it's simply artificial intelligence. And a pretty inexpensive one. I paid only a few cents to our "digital elves" for assisting me in recognising these documents in the video. The cost of human labor would most likely be much higher. TECH STACK Of course, you first need a Caspio plan with REST API and Zapier Integration. The Professional plan offers it, but you may buy it as an add-on to smaller plans. In this example, we used Google Document AI's Invoice Processor to do the work. It has some limits but is a good place to start and see quick results. And you can overcome these limits with more advanced methods. However, for this demo, it's more than enough. At first, I considered using Zapier for this demo because it was easy. But I know many people here find Zapier too expensive. So, we chose a more budget-friendly option. We used the newly introduced Caspio Webhooks and Make (Integromat) as middleware. This is just an example; you can use any technology you like. MAIN COMPONENTS: To make Document Understanding work, you need three main parts: OCR (Optical Character Recognition): This tech changes a binary file (like a photo taken with your phone) into text. Text Extractor: This tool looks for specific info (like invoice numbers or dates) and gives it back in an organized way. Middleware: This is the connector between Caspio and AI services. It takes a file from Caspio, sends it for processing, returns the data, and puts it into a Caspio table. GOOGLE DOCUMENT AI Google Document AI can do tasks #1 and #2. You can learn more about this service here and here's how to set it up. Of course, Google Document AI is not the only option, but it's an excellent place to start. Once you know its limits, you'll know how to work around them. There are many ways to do this. For example, in most of our projects, we use Google Document AI mainly for OCR. Then, we process the text with a tool from OpenAI, the creators of ChatGPT. But that's more advanced, and I don't want to make things too complicated in this article. MIDDLEWARE Google Document AI comes with a robust and well-explained API. But it needs incoming calls to have a particular format and gives back answers in its own format. If you're already using Zapier with Caspio, you might find it the easiest option, and you probably know how to use it. If so, skip to the Make Scenario section below for extra ideas. But if you're not using Zapier, stay with me. This post will focus on Caspio Webhooks as a more budget-friendly choice. Webhooks are good, but they have a limit: they're set in a standard way and don't allow much change. So, you'll need another tool to take the webhook call from Caspio and change it into a format that Document AI understands. There are many choices for this, and it's a big topic that could have its own set of detailed articles. For this demo, we'll use Make (Integromat). We find it even better than Zapier, but cheaper. They also have an excellent free plan that might be enough for smaller projects. Finally, Caspio has built a connector for Make, making it easy to set up, even if you're not an API expert. CASPIO CONFIGURATION To keep it easy, we turned on the FileStor option. This lets us get the file from Caspio using a direct link. I know this isn't the most secure way to handle files, but that's not the main point of this article, so I hope you understand. We also made a table and a few data pages in our demo app. These let you create a record and upload a file. Next, we set up a Caspio webhook that starts when a new record is added (Insert event). This webhook sends the call to Make's incoming webhook. Finally, we made a Web service profile so Make can talk to Caspio using REST API and return the results to the table. All these steps are well-covered in the Caspio manual, and there are also good video tutorials. So, I won't go into the details here. (If you need those, just ask in the comments, and I can post the links.) SCENARIO IN MAKE The process has just six steps in order: An incoming webhook that waits for calls from Caspio. A 10-second pause to give Caspio time to send the file to FileStor. A simple GET request to get the file from FileStor. Some minor changes to the data to get it ready for Document AI (details below). A call to Document AI to send the prepared data. A standard Caspio connector that puts the data back into the Caspio table. If you're new to Make or APIs and find all of this confusing, let me know if you'd like more details. I intended this post to be an outline rather than a step-by-step guide. However, I can explain things further if needed. It's not rocket science. But If you're familiar with Make or at least REST API, most of these steps should be pretty straightforward. The only part that might need some extra attention is step #4, where we set up headers and converted the binary file to base64. Here's how we set it up: If you've done everything right, you should be good to go! Not too hard, right? MORE ON THE TOPICS In this post, we've just touched the tip of the iceberg on Document Understanding. It's a big topic that could fill many more articles and take hundreds of hours to make a really deep dive. This is especially true for understanding complex documents like contracts or unstructured text documents. And the real magic happens when you move past ready-made solutions and train AI models with your own data. Learning all this can be a fun adventure, and the possibilities are endless. However, even with simple setups, AI can be a game-changer for many businesses. It can save time on dull tasks and let your team focus on more important work instead of just copying data from paper to an app. But AI isn't just about Document Understanding; it has lots more to offer. Here are a few more examples: Semantic Search: This isn't just looking up keywords; it understands the meaning of your question, irrespective of the words you choose. This can be useful for Knowledge Management and Customer Support apps. Voice-to-Text: Turn your video calls into text, summarize what was said, and add it to your Caspio app as follow-up notes. This is good for CRM, Project Management, Knowledge Management, and Recruitment apps. Classification of Incoming Requests: Automatically sort new requests and applications based on its content. This can help with CRM, Customer Support, and Recruiting apps. And there's much more. FINAL REMARKS I must say, this article ended up being longer than I first thought it would be. So, big thanks to you for sticking with me till the end! If anything was unclear or you ran into issues, please feel free to leave a comment or write me a DM if you prefer. I'll do my best to help you out. Now, I'd really like to hear your thoughts. Did I explain it well, or did it just confuse you? Does it make sense for you? Are you interested in this topic at all? Do you want to see more articles like this one? If so, what would you like me to focus on? More technical details? Real-world examples? A different writing style? I welcome your feedback and constructive criticism. Thank you!3 points
-

Directory Activation Email DNS
oliverk and 2 others reacted to CoopperBackpack for a question
Hi @ccxc007, I checked this with the support team a while ago and the answer was that this option will be added in future releases. Hopefully, it will be added in the next release. We`ll see3 points -
Just for future reference, questions like these can be quickly answered by ChatGPT, Bard, Bing, or other AI tools. I just put the question as you wrote it in ChatGPT and it gave me @ianGPT's answer in just a few seconds. It is very helpful and can be used for many coding questions.3 points
-

Conditionally Disable View Details record action
DemoC and 2 others reacted to Volomeister for a topic
Hi @bookish You can do it without JavaScript 1. Use the calculated field to return a link you need as an HTML string. For example: CASE WHEN [@field:Name]= "Test1" THEN '<a href="detailsLink?parametername='+ [@field:RandomID]+ '">Details page </a>' ELSE '' END 2. Add this calculated field as HTML to HTML block: 3. Place the calculated field in 1st position and add the following CSS in the header of your DataPage: <style> dt:nth-child(1), dd:nth-child(2) { display: none; } </style> Hope it helps
 3 points
 -

Apply CSS for Nth Child to Nth Child
autonumber and 2 others reacted to futurist for a topic
For instances wherein you need to apply CSS to multiple sibling elements at the same time, for example hiding the 8th to 11th column in a Tabular Report DataPage, what we would normally do is to refer to each of those elements individually, like so: <style> form[action*='[@cbAppKey]'] tr.cbResultSetDataRow td:nth-child(8), form[action*='[@cbAppKey]'] tr.cbResultSetTableHeader th:nth-child(8), form[action*='[@cbAppKey]'] tr.cbResultSetDataRow td:nth-child(9), form[action*='[@cbAppKey]'] tr.cbResultSetTableHeader th:nth-child(9), form[action*='[@cbAppKey]'] tr.cbResultSetDataRow td:nth-child(10), form[action*='[@cbAppKey]'] tr.cbResultSetTableHeader th:nth-child(10), form[action*='[@cbAppKey]'] tr.cbResultSetDataRow td:nth-child(11), form[action*='[@cbAppKey]'] tr.cbResultSetTableHeader th:nth-child(11) { display:none !important; } This approach works, but this would be lengthy, especially if there are more sibling elements you have to include in the CSS. This can actually be shortened, wherein you would only have to specify the range of siblings that are going to be included. Using the above example, it could be further shortened to this: form[action*='[@cbAppKey]'] tr.cbResultSetDataRow td:nth-child(n+8):nth-child(-n+11), form[action*='[@cbAppKey]'] tr.cbResultSetTableHeader th:nth-child(n+8):nth-child(-n+11) { display:none !important; } Wherein the "8" represents the starting point, and the "11" is the ending point. So everything within this range (8th to 11th sibling) would be included, and the rest are not.3 points -

Solution - View of IDs Based on 2 Fields
biota and 2 others reacted to ChristianM for a question
Thought this might help anyone struggling as I did to create a View of only IDs (1) not duplicated between two tables or (2) duplicated between two tables but a second field is a certain value. I have two tables: 1. Table A - has a list of every available ID 2. Table B - contains IDs of inserted records (can have same ID on multiple records) I did a full outer join on the two tables in a View based on the ID First criteria only show IDs that are in Table A but not in Table B I then only want to include IDs if the record is in Table A and Table B, but a second field has a value of "Yes". However, Table B can have multiple records with the same ID with the second field with values of "Yes" or "No". The Not Equal filter wouldn't work because you can't NOT at the AND level. To solve this I added a sub-AND filter with two lines stipulating what I wanted the field to be and what I wanted it not to be.

 3 points
 -
I had a problem with Map Mashup and correcting deploying the map icons in different colors based on criteria. I am using URL deployment so the instructions would differ based on your deployment method. Caspio support helped me resolve the issue by 1) disabling Ajax loading (you first have to unclick responsible on the Data Page Data Source Page ) and 2) use a Search Result on two separate pages (not on the same search page) and 3) putting the initial code snippet in the Header for the Results Page (not the Search Page). Now the map icons display correcting.3 points
-

Hide/Show Update button when certain condition is met
KG360 and 2 others reacted to BaySunshine for a topic
Hi @beryllium, A standard way of achieving this without using JavaScript is below: Add a Header/Footer to your page. Enter following code to hide the existing Update button: <style> .cbUpdateButton { display: none !important; } </style> Add a new section and in it add an HTML Block. Enter following code to add a custom Update button: <div id="update" align="center"> <input type="submit" class="cbSubmitButton" value="Update" /> </div> Now add a Rule. It should look like below: Replace "Value" with your field name. I hope this helps. Regards,
 3 points
 -

Caspio Is Free of Charge for Apps To Help Ukraine
LWSChad and 2 others reacted to Elizabet97 for a topic
I'm from Ukraine , thank you for your help!3 points -
Preview a PDF before It is Uploaded in a DataPage
Queso and 2 others reacted to Volomeister for a topic
Hi there. I was trying to find a way to preview a PDF file before it is uploaded in a DataPage. The flow described in this article works for images only: https://howto.caspio.com/tech-tips-and-articles/advanced-customizations/preview-an-image-before-it-is-uploaded-in-a-datapage/ Here is a solution I came up with: <script> const HTMLFileInput = document.getElementById("EditRecordFile_1"); HTMLFileInput.addEventListener("change", event => { const src = URL.createObjectURL(event.target.files[0]); const outputWidth = window.getComputedStyle(HTMLFileInput.parentElement.parentElement).getPropertyValue('width') const outputHeight = parseInt(outputWidth.replace('px',''))*1.3+'px' if(document.querySelector('#output')==null) { HTMLFileInput.parentElement.insertAdjacentHTML('afterend', `<iframe src="${src}" width="${outputWidth}" height="${outputHeight }" id="output" class="cbFormFieldCell">IFRAME IS NOT SUPPORTED IN YOUR BROWSER</iframe>`) } else { document.querySelector('#output').setAttribute("src", src) } }) </script> Just substitute EditRecordFile_1 with id of your file input. You can also tweak the value of width and the height of the iframe so it fits your usual pdf file size. Hope this helps3 points -
You can create a simple formula inside a virtual field that will check if both dates are the same with something like this: case when [@field:Date1] = [@field:Date2] then 'ERROR' else 'GOOD' end You can hide this virtual field when testing is done. Next, you need to add a Header and Footer and add the following JavaSrcipt code at the Header: <script type="text/javascript"> document.addEventListener('BeforeFormSubmit', function(event) { var Input1 = document.querySelector("span[id^='cbParamVirtual1']").innerHTML if (Input1 === 'ERROR') { event.preventDefault(); alert('Your Dates have the same value'); } }); </script> Make sure to disable HTML editor and replace cbParamVirtual1 with the respective virtualfield name ex. If you're using Virtual3 for this formula then it should be cbParamVirtual3. You can also edit the alert to display any message you want. The "event.preventDefault();" will prevent submission of the current input.3 points
-
Google Map Mashup Set-Up with Casio URL Deployment
sistemaslt and 2 others reacted to jbloome for a question
One correction: on #5: Put in the Search and Results Table the Datapage where you will install the Map Mashup code not from the table where the data will be coming (e.g. my Maps Datapage pulls data from my homes_table so I would select the Maps Datapage as the Search and Results Table).3 points -
Since it appears nobody has done this before and support from Caspio isn't willing to make their documentation clear enough to figure this out, I spent many hours in trial and error to figure out how the API works and to do so with PHP...which everyone on the web should know. Below is the code sample that when called through a URL with query values will: 1) attempt to get a file which will store the auth token in a function 2) if there is no file, get a new auth token and then store it in a bearer file in a function 3) attempt to write the value to the field in the table 4) if unsuccessful, try renewing the token, store the new token, and write to the table again. This should hopefully live forever and never need me to go and renew the tokens, which is a pain and prone to messing up the program someday. This is what I was looking for all over the forums. Hopefully this will help someone someday: <?php $bearer_filename="bearer.php"; //file to hold function which responds to request for current auth token $sub_domain="c1eib....";//replace with the subdomain Caspio assigns to your url for token auth $client_id='e16e1a....replace with your client id 51ade07'; $client_secret='e235b22....replace with your secret.......d4b3d9c1e6d8a5'; function getBearer(){ global $sub_domain; global $client_id; global $client_secret; $body="grant_type=client_credentials&client_id=".$client_id."&client_secret=".$client_secret; $grant_type='grant_type=client_credentials'; $auth_url='https://'.$sub_domain.'.caspio.com/oauth/token'; $curl = curl_init(); curl_setopt($curl, CURLOPT_URL, $auth_url); curl_setopt($curl, CURLOPT_POST, 1); curl_setopt($curl, CURLOPT_POSTFIELDS, $body); curl_setopt($curl, CURLOPT_RETURNTRANSFER, true); $result = curl_exec($curl); if(!$result){return "Connection Failure";} curl_close($curl); return $result; } function updateTable($table,$id,$matching,$field,$value,$auth){ global $sub_domain; $auth=json_decode($auth); $url = 'https://'.$sub_domain.'.caspio.com/rest/v2/tables/'.$table.'/records?q.where='.$id.'%3D'.$matching; $update=array($field => $value); $postdata=json_encode($update); $auth = 'bearer '.$auth->access_token; $curl = curl_init(); curl_setopt_array($curl, array( CURLOPT_URL => $url, CURLOPT_RETURNTRANSFER => true, CURLOPT_ENCODING => "", CURLOPT_MAXREDIRS => 10, CURLOPT_TIMEOUT => 30, CURLOPT_HTTP_VERSION => CURL_HTTP_VERSION_1_1, CURLOPT_CUSTOMREQUEST => "PUT", CURLOPT_POSTFIELDS => $postdata, CURLOPT_HTTPHEADER => array( "Authorization:" . $auth, "accept: application/json", "cache-control: no-cache", "content-type: application/json", 'Content-Length: ' . strlen($postdata) ) )); $results=curl_exec($curl); curl_close($curl); echo $results; $response=json_decode($results); if($response->RecordsAffected==1){ echo "<br>Updated 1 row successfully"; }else{ //get the auth key and try again } return $response; } function createBearer(){ global $bearer_filename; $new_auth = getBearer(); //get new bearer tokens $code='<'.'?php function getAuth(){return \''.$new_auth.'\';} ?'.'>'; //code for file with function to return values file_put_contents($bearer_filename,$code); return $new_auth; } if(!file_exists($bearer_filename)){ //create new bearer file and get auth $auth = createBearer(); }else{ //file exists with function to give auth include $bearer_filename; $auth = getAuth(); } //get values from URL for posting to table $table=$_GET["Table"]; $id=$_GET["ID"]; $matching=$_GET["Matching"]; $field=$_GET["Field"]; $value=$_GET["Value"]; $results = updateTable($table,$id,$matching,$field,$value,$auth); if($results->Message=="Authorization has been denied for this request."){ echo "<br>Problem with update. Try getting new bearer and try again"; $auth = createBearer(); //could be that the token has expired. create new one, save the file and try again with fresh token $results = updateTable($table,$id,$matching,$field,$value,$auth); echo "Results after retry:".$results; } ?> Wherever you place this on your server, you can call it directly using: https://...your url to this php file...?Table=YOUR_TABLE&ID=FIELD_NAME_IN_TABLE_FOR_MATCHING_ID&Matching=VALUE_TO_MATCH_ID&Field=FIELD_YOU_WANT_TO_UPDATE&Value=VALUE_YOU_WANT_IN_THE_FIELD This was design for a single field update in a single row. You will need to adapt for any other use, but at least I will hopefully never have to worry about an auth token ever again and my program will be stable.3 points
-

Hide Column In Tabular Report
Lepidoptera and 2 others reacted to KlisaN137 for a topic
This hiding of the columns can also be achieved by using only JavaScript in the Footer: <script> document.addEventListener('DataPageReady', function (event) { let label = document.querySelector('table[data-cb-name="cbTable"] th:nth-of-type(8)'); // Select the label of eighth column let values = document.querySelectorAll('table[data-cb-name="cbTable"] td:nth-of-type(8)'); // Select all the values in the eighth column /* Removing the selected fields */ label.parentElement.removeChild(label) values.forEach(el => { el.parentElement.removeChild(el) }); /* If we want to remove additional columns */ label = document.querySelector('table[data-cb-name="cbTable"] th:nth-of-type(5)'); // Select the label of fifth column values = document.querySelectorAll('table[data-cb-name="cbTable"] td:nth-of-type(5)'); // Select all the values in the fifth column label.parentElement.removeChild(label) values.forEach(el => { el.parentElement.removeChild(el) }); }); </script> Main difference between this and approach with CSS is that here columns are entirely removed from the page, and not just hidden - in the CSS approach you could still find the elements if you inspect the page, and access the information in them, but in this JavaScript approach, they are completely removed from the page. Notice however, that in the above example we are first removing the column that comes after and work our way to the beginning. If we would also like to remove tenth column, we would put that code before the code for removal of the eighth.3 points -
Hello @DDLiving, You may refer to this screenshot to achieve that.
 3 points
 -
Not sure if what I understood is correct, but, you can try this, create a Calculated Value, this is to check if the date today is less than 5 or not. If it's 1, user can input any date, if it's 0, only on the current month and later. CASE WHEN DATEPART(day, GetUTCDate()) <5 OR (DATEPART(day, GetUTCDate()) >= 5 AND DATEPART(month,GetUTCDate()) <= DATEPART(month, [@field:Date])) THEN 1 ELSE 0 END Script on the footer: (change the number on cbParamVirtual1 depending in your Virtual Field) <script> document.addEventListener("BeforeFormSubmit", function(e){ var a= document.querySelector("input[name='cbParamVirtual1']").value; if (a == 0){ e.preventDefault(); alert("Please input Date within or after the current month"); } }); </script> If you want this to trigger on change of the field that is being used in the Calculated Field. Change the InsertRecordFIELDNAME to your actual field's id cbParamVirtual1 to your Virtual Field's name if it's 1 2 3 or whatevers <script> document.getElementById("InsertRecordFIELDNAME").addEventListener("change", function(e){ document.querySelector("input[name='cbParamVirtual1']").addEventListener("change", function checker(){ var a= document.querySelector("input[name='cbParamVirtual1']").value; if (a == 0){ //if Calculated Value is 0 then alert alert("Please input Date within or after the current month"); //add another code } this.removeEventListener("change",checker); }); }); </script>3 points
-
Just leaving this here ... <script> document.addEventListener('DataPageReady', function(event) { function hideControlsForPerson() { var table = typeof document.getElementsByClassName("cbResultSetTable" + event.detail.uniqueSuffix)[0] == "undefined" ? document.getElementsByClassName("cbResultSetTable")[0] : document.getElementsByClassName("cbResultSetTable" + event.detail.uniqueSuffix)[0]; // Find the index of the last column, which happens to be the inline edit/delete var total_num_columns = table.rows[0].cells.length; var controlsColumnIndex = total_num_columns - 1; //position of the column with inline edit/delete // Find the index position of the column by searching the column's label row = table.rows[0]; var i; var KeyColumnIndex; for (i = 0; i < total_num_columns; i++) { if (row.cells[i].textContent == 'Label_of_Target_Field') { KeyColumnIndex = i; i = total_num_columns; // this is essentially to exit the loop } } // Iterating through rows and hiding Content for (var i = 1, row; row = table.rows[i]; i++) { if (row.cells.length > KeyColumnIndex && row.cells[KeyColumnIndex].textContent !== '[@authfield:Name]') { row.cells[controlsColumnIndex].style = "display:none;" } } } hideControlsForPerson( ); }); </script> Note: " row.cells.length > KeyColumnIndex " was added to the if statement to protect against an uncaught TypeError that happens if using a date rollup or other field grouping.3 points
-

Using Table Variables in Triggered Actions
Lepidoptera and 2 others reacted to NiceDuck for a question
An Agent from Chat support gave me this doc. Its not official but I hope it helps quack: Table Variables .pdf3 points -

How Can I Format A Text Field As A Dollar?
JMR21 and 2 others reacted to Vitalikssssss for a topic
Hi @bbewley, @kpcollier, You may try using this JS which should go to the Footer: <script type="text/javascript"> function formatAsDollars(el) { el.value = el.value.replace(/[^\d]/g,'').replace(/(\d\d?)$/,'$1').replace(/^0+/,'').replace( /\d{1,3}(?=(\d{3})+(?!\d))/g , "$&,"); el.value = el.value ? '$' + el.value : ''; } let fields = ["FIELD_1", "FIELD_2"]; //specify your fields here fields.forEach(element => { element = "InsertRecord" + element; // replace "InsertRecord" with "EditRecord" for Details/Single Record Update DP document.getElementById(element).onkeyup = function() { formatAsDollars(this); } document.getElementById(element).onchange= function() { formatAsDollars(this); } }); </script> Pay attention to comments. Hope this helps. Vitalikssssss3 points -

Set Date to Null or Empty
KwentenB and 2 others reacted to AtayBalunbalunan for a question
One solution to this is using a Calculated Value as the form element with this formula: CAST(null as datetime) If you wish to hide this field, you may use HTML Blocks: https://howto.caspio.com/tech-tips-and-articles/common-customizations/how-to-hide-fields-in-datapages/3 points -
Hello I want to share something with you guys again. Back then when I only have an 'explore plan', I'm using this workflow to send acknowledgement/notification emails on different persons base on a value of a field in my submission form. My workflow back then is I have a submission form for job applicants. I want to send an email to a certain member of my company depending on which position the applicant is app laying. for example. If the applicant is applying for a staff position, there will be an email an email send to staff manager, If the applicant is applying for an agent position, there will be an email an email send to agent manager. etc... This could easily be done via trigger but since it was unavailable on explore plans. This is what I did. First I made a lookup table containing the emails of the designated managers where I used the job they are managing as a unique field. Then on my submission form. I made a virutal field and set it as a cascading dropdown that is using the field for the position the user is applying for as a parent field and used the table containing the emails of the managers as a lookup table. I enveloped this virtual field with html blocks with html codes for hiding fields. please see this documentation for reference : https://howto.caspio.com/tech-tips-and-articles/common-customizations/how-to-hide-fields-in-datapages/ and https://howto.caspio.com/datapages/datapage-components/cascading-elements/ . Now that it was hidden, we will now proceed to the messaging options. It is up to you to chose if you want an Notification emails or Acknowledgement emails. As I check It works with any of them as long as you are going to use the virtual field with cascading value as the field reference for email. It will now send an email on different person depending on what job the user is applying to. I hope it helps anyone. Also please comment if you have a better idea. Quack3 points
-

Hide Search button
HeyItsDoug and 2 others reacted to Barbie for a topic
Hi Watusi, You can try to paste this code in your header instead: <style> input[class*="cbSearchButton"]{ display:none !important; } </style> I hope this works for you.3 points -
listbox choice appear in a text area
directrix and 2 others reacted to LunaLovegood for a question
Hello @Medron, You can try this code: — Luna — 3 points
 -
Hi NeoInJS, Please try using this formula: FLOOR( ( DATEDIFF(day, CONVERT(datetime, CAST(DATEPART(year, [@field:Start_Time]) AS CHAR(4)) + '-01-01', 101), [@field:Start_Time]) + ( 7 - ( ( ( ( DATEPART(day, [@field:Start_Time]) + FLOOR(13 * ((CASE WHEN DATEPART(month, [@field:Start_Time]) < 3 THEN DATEPART(month, [@field:Start_Time]) + 12 ELSE DATEPART(month, [@field:Start_Time]) END) + 1) / 5) + ((CASE WHEN DATEPART(month, [@field:Start_Time]) < 3 THEN DATEPART(year, [@field:Start_Time]) - 1 ELSE DATEPART(year, [@field:Start_Time]) END) % 100) + FLOOR(((CASE WHEN DATEPART(month, [@field:Start_Time]) < 3 THEN DATEPART(year, [@field:Start_Time]) - 1 ELSE DATEPART(year, [@field:Start_Time]) END) % 100) / 4) + FLOOR((CASE WHEN DATEPART(month, [@field:Start_Time]) < 3 THEN DATEPART(year, [@field:Start_Time]) - 1 ELSE DATEPART(year, [@field:Start_Time]) END) / 400) + 5 * ((CASE WHEN DATEPART(month, [@field:Start_Time]) < 3 THEN DATEPART(year, [@field:Start_Time]) - 1 ELSE DATEPART(year, [@field:Start_Time]) END) / 100) ) % 7 ) + 6 ) % 7 + 1 ) ) ) / 7 ) + 1 NOTES: You must replace all instances of [@field:Start_Time] with your actual field. You can test for correctness by adding a calculated field that uses DATEPART(week, [@field:Start_Time]).3 points
-

Only display records older than specified time
ChristianM and 2 others reacted to Ariel for a question
Hi Adam, You could add a new field "Date_filter" of Formula data type to your table and use the following function: Dateadd(hour,24,[@field:timestamp]) Replace [@field:timestamp] with the name of your field that holds date/time of original submission. In the pre-defined criteria report, on Select Filtering Fields screen, move "Date_filter" to Selected Fields area. On the Configure Filtering Fields screen click on the "Date_filter" field and choose "Before Now" as comparison type. Hope this helps. Ariel3 points -
There's a spot on the Styles page for it. Go to your Styles tab > Select Style that is your datapage uses > Go to 'Labels' under Results Page > 3rd option down, 'Sorting Marker'. There you can change what color icon to use for the markers.2 points
-

Date format
researched and one other reacted to MickyMartian232 for a question
Date/Time Formats Last Updated: 2021-03-03 The Date Formats global option changes the default date format for all maps or forms. However, the format of the existing date fields do not change; the default is only used for new maps or forms. This table lists the valid date and time formats. Format Description YYMMDD Two-digit year, two-digit month, two-digit day MMDDYY Two-digit month, two-digit day, last two digits of year (example: 121599) YYYYMMDD Four-digit year, two-digit month, two-digit day (example: 19991215) DDMMYYYY Two-digit day, two-digit month, four-digit year (example: 15121999) MMDDYYYY Two-digit month, two-digit day, four-digit year (example: 12151999) DDMMYY Two-digit day, two-digit month, last two digits of year (example: 151299) YYMMMDD Last two digits of year, three-letter abbreviation of the month, two-digit day (example: 99JAN02) DDMMMYY Two-digit day, three-letter https://greecepowerballresults.co.za/abbreviation of the month, last two digits of year (example: 02JAN99) MMMDDYY Three-letter abbreviation of the month, two-digit day, last two digits of year (example: JAN0299) YYYYMMMDD Four-digit year, three-letter abbreviation of the month, two-digit day (example: 2003JUL04) DDMMMYYYY Two-digit day, three-letter abbreviation of the month, four-digit year (example: 04JUL2003) MMMDDYYYY Three-letter abbreviation of the month, two-digit day, four-digit year (example: JUL042003) YYDDD Last two digits of year, three-digit Julian day (example: 99349 for the 349th day of 1999) DDDYY Three-digit Julian day, last two digits of year (example: 34999) YYYYDDD Four-digit year, three-digit Julian day (example: 1999349) DDDYYYY Three-digit Julian day, four-digit year (example: 3491999) YY/MM/DD Last two digits of year, separator, two-digit month, separator, twodigit day (example: 99/12/05) DD/MM/YY Two-digit day, separator, two-digit month, separator, last two digits of year (example: 05/12/99) MM/DD/YY Two-digit month, separator, two-digit day, separator, last two digits of year (example: 12/15/99) YYYY/MM/DD Four-digit year, separator, two-digit month, separator, two-digit day (example: 1999/12/15) DD/MM/YYYY Two-digit day, separator, two-digit month, separator, four-digit year (example: 15/12/1999) MM/DD/YYYY Two-digit month, separator, two-digit day, separator, four-digit year (example: 12/15/1999) YY/MMM/DD YY/MMM/DD Two-digit year, separator, three-letter abbreviation of the month, separator, two-digit day (example: 99/JUL/20) DD/MMM/YY Two-digit day, separator, three-letter abbreviation of the month, separator, two-digit year (example: 20/JUL/99) MMM/DD/YY Three-letter abbreviation of the month, separator, two-digit day, separator, two-digit year (example: JUL/20/99) YYYY/MMM/DD Four-digit year, separator, three-letter abbreviation of the month, separator, two-digit day (example: 2003/JUL/25) DD/MMM/YYYY Two-digit day, separator, three-letter abbreviation of the month, separator, four-digit year (example: 25/JUL/2003) MMM/DD/YYYY Three-letter abbreviation of the month, separator, two-digit day, separator, four-digit year (example: JUL/25/2003) YY/DDD Last two digits of year, separator, three-digit Julian day (example: 99/349) DDD/YY Three-digit Julian day, separator, last two digits of year (example: 349/99) YYYY/DDD Four-digit year, separator, three-digit Julian day (example: 1999/ 349) DDD/YYYY Three-digit Julian day, separator, four-digit year (example: 349/ 1999) MONTH Month (example: December) DAY Day of the week (example: Friday) HHMM Two-digit hour, two-digit minutes (example: 0330 for 30 minutes past 3 o'clock) HHMMSS Two-digit hour, two-digit minutes, two-digit seconds (example: 033045 for 30 minutes and 45 seconds past 3 o’clock) HH:MM Two-digit hour, separator, two-digit minutes (example: 03:30) HH:MM:SS Two-digit hour, separator, two-digit minutes, separator, two-digit seconds (example: 03:30:45) YYYYMMDDTHH MMSS.mmmZ ISO-8601 format: Four-digit year, two-digit month, two-digit day, T (time) indicator, two-digit hour, two-digit minutes, two-digit seconds in Universal Time (also called Zulu Time or Greenwich Mean Time), Z (Zulu time) indicator (example: 20031209T123000.000Z) YYYYMMDDZ ISO-8601 date format: Four-digit year, two-digit month, two-digit day, Z (Zulu time) indicator (example: 20031209Z) MM/DD/YY HH:MM:SS Two-digit month, separator, two-digit day, separator, last two digits of year, two-digit hour, separator, two-digit minutes, separator, two-digit seconds (example: 12/15/99 03:30:45) YYMMDD HHMMSS Last two digits of year, two-digit month, two-digit day, two-digit hour, two-digit minutes, two-digit seconds (example: 991025 033045) YYYY-MMDDTHH: MM:SS Four-digit year, separator, two-digit month, separator, two-digit day, T represents a blank separator, two-digit hour, separator, twodigit minutes, separator, two-digit seconds (example: 2002-02-02 03:30:45) YYYY-MM-DD Four-digit year, separator, two-digit month, separator, two-digit day (example: 2002-02-02) YYYY-MM Four-digit year, separator, two-digit month (example: 2002-02) YYYY Four-digit year (example: 2002) --MM-DD Two dashes, two-digit month, separator, two-digit day (example: - -12-02) ---DD Three dashes, two-digit day (example: ---02)2 points -
Hi @Meekeee, Sorry it took so long to get back to this thread but I was finally able to revisit and implement this last piece of the puzzle--perfection! This is exactly what the whole process needed, now it's a really seamless UI for the Caspio user. Many thanks (to @futurist as well) for offering this solution and following up with the necessary tweaks to integrate it into Caspio. Really an excellent calendar solution I imagine a lot of people on Caspio will use.2 points
-
This is not really a question, just wanted to share what I found out when experimenting with calculated fields, calculated values, and formula fields. Basically when you created a formula that contains conditions the system pulls the first record in your table and run those fields in your condition and if that doesn't encounter an error then the formula is considered "valid". As an example, lets say you have 2 date fields (Date_1 and Date_2) and you used this fields in the formula below CASE WHEN [@field:Date_1 ] = [@field:Date_2] THEN 1 WHEN [@field:Date_1 ] < [@field:Date_2] THEN 2 ELSE 1/0 If your source table doesn't have any records the formula will be valid since 'null' is equals to 'null' and the 1st WHEN condition is satisfied. If your source table have records and Date_1 is equals to Date_2 then the formula is still valid since it satisfies the 1st WHEN condition If your source table have records and Date_1 is less than Date_2 then the formula is still valid since it satisfies the 2nd WHEN condition if your source table have records and Date_1 is not equals, or not less than Date_2 then the formula will encounter an error since this will fall to the ELSE condition, and 1/0 is a mathematical error.2 points
-
There use to be a Caspio HowTo article on this, but for some reason they removed it. You can find the code used for this from my answer on this forum post: Also, here is the YouTube video that went along with the now-deleted Collapsible Section article, it is still useful. https://www.youtube.com/watch?v=tNy1G-F3HiE2 points
-
Hello! These articles might help you as well. - https://www.caspio.com/caspio-recognized-amazon-web-services-partner-network-advanced-technology-partner/ - https://www.caspio.com/caspio-expands-its-platform-as-a-service-to-meet-global-market-demands-utilizing-amazon-web-services/2 points
-
I also experienced this issue a last month. What I did is that I also allow or checked the 'Read App' for the application where my DataPage belongs and it is now permitting my external users to access the DataPage.2 points
-
 Just include the dates in the criteria. On Search Filters, enable the On Exit, and then you can then use these parameters on the WHERE (i.e. WHERE Call_Outcome = 'Sale/Offered' AND DateColumn >= '[@DateParameter1]' AND DateColumn <= '[@DateParameter2]'2 points
 -
Change data entered into form fields to Uppercase
networtharticles and one other reacted to CoopperBackpack for a topic
Hi, Wanted to add the solution about how to add the UpperCase() function to the particular field/fields on the Submission form. You may add the code to the Footer section of the DataPage (do not forget to disable the HTML editor before pasting): < script > document.addEventListener('DataPageReady', upperCaseHandler); const ids = '#InsertRecordFieldOneName, #InsertRecordFieldTwoName, #InsertRecordFieldThreeName'; //replace with your local field names function upperCaseHandler() { document.querySelectorAll(ids).forEach(element => element.addEventListener('change', (event) => { element.value = element.value.toUpperCase(); })) }; </script> The only thing you need to change is to replace the field names that are listed in the const ids. Please note that the id of the field on the Submission form has syntax as #InsertRecordYour_Field_Name Maybe this post is helpful https://forums.caspio.com/topic/4377-js-guide-caspio-form-elements/ Also, it is possible to add the required number of ids (it can be 1, 2, 3, etc.)2 points -
Thanks @kpcollier and @sandy159 - the difference in days option worked. Appreciate your help.2 points
-

Creating Audit Trail via Triggered Actions
ColBasicuser and one other reacted to Glitch for a question
If you want to retrieve the old value and the new value at the same time, like what I mentioned on the previous response, all you need to do is to join the inserted table with the own table. Here's a screenshot on how to do that. (This is just and idea how to do this, though I don't know your exact workflow) On the table where you're inserting, this will be the value: I hope this helps.


 2 points
 -
Copy search field value to input field
DefinitelyNot31337 and one other reacted to Glitch for a question
Hi @philippe, You can use Javascript for this. First, you need to pass the parameter from the search form. Then inside your Results Page, add a Header and Footer. Put this code inside your footer (make sure to disable HTML Editor) <script> // Replace Value to Parameter name var passID = '[@Name]'; // Replace Value to the Field Name of Event ID inside table var this_field= 'Name'; var insert_field = document.querySelector('form[action*="[@cbAppKey]"] #InlineAdd' + this_field); insert_field.value = passID; </script> Just a little something I learned from this post: Thanks Mahfriend Sample Page: https://c0acd927.caspio.com/dp/e6cb6000e2c14d25606f4cd1ae1b I hope this helps. Glitch. 2 points
 -
Hi @deemuss, Yes, it can be done with the jQuery code. You should go to the editing Authentication screen, where there are two fields - Name and Password, for example. Add header and footer element and HTML block. Put the following code to the header element for jQuery library: <script src="https://code.jquery.com/jquery-1.9.1.js"></script> Put the following code into the HTML block for the "Remember me" checkbox: <label class="checkbox"> <input type="checkbox" value="remember-me" id="remember_me"> Remember me </label> Put the following code into the footer element for the jQuery code: <script> $(function() { if (localStorage.chkbx && localStorage.chkbx != '') { $('#remember_me').attr('checked', 'checked'); $('#xip_Name').val(localStorage.usrname); $('#xip_Password').val(localStorage.pass); } else { $('#remember_me').removeAttr('checked'); $('#xip_Name').val(''); $('#xip_Password').val(''); } $('#remember_me').click(function() { if ($('#remember_me').is(':checked')) { // save username and password localStorage.usrname = $('#xip_Name').val(); localStorage.pass = $('#xip_Password').val(); localStorage.chkbx = $('#remember_me').val(); } else { localStorage.usrname = ''; localStorage.pass = ''; localStorage.chkbx = ''; } }); }); </script> where #xip_Name is an ID for the Name field and #xip_Password is an ID for the Password field. Please see this screenshot for better understanding:
 2 points
 -

How to set Date field automatically to default today's date?
Lepidoptera and one other reacted to Becca37 for a question
Howdy! This works when the field is display only, but when it's a text field with calendar popup, there's no format option. If the OP wants the date and not the time on a user-changeable field they should use the option May Music recommended. Both are great options, but cover different scenarios. :0) 2 points

.thumb.jpg.03878e50b4d1236f6c1e432d00fe2a55.jpg)


